BatchPhoto's user interface is designed as a Wizard, in the third step of the wizard you will setup the final parameters needed to process your photos.
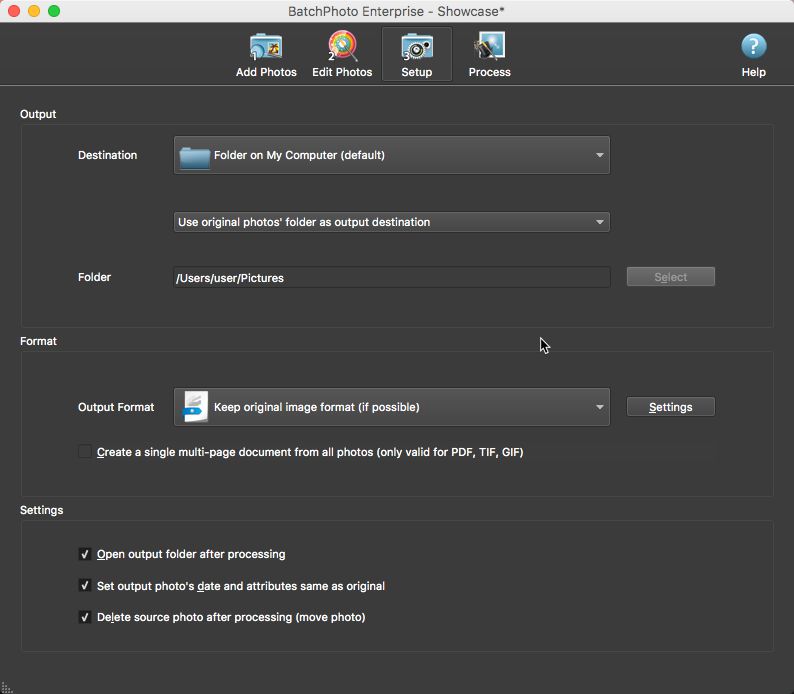
1. Output
1.1 Folder on My Computer
•By default, BatchPhoto will save the processed photos on the current user's computer in the MyPictures folder
•To save the photos in a folder of your choice, select the Use selected folder as output destination option from the combo-box beneath the Destination and press the Select button. A dialog box will be displayed on the screen and you will need to navigate to the desired folder
•To save the processed photos into the original photo's folder choose the Use original photos' folder as output destination option from the previously mentioned combo-box. You will be asked if you want to overwrite the original photos if the names have not been changed. Please note that BatchPhoto Monitor will ignore this option and save your photos by default in the output folder which can be selected by choosing the Use selected folder as output destination option from the same combo-box
•If you choose the Recreate original folder structure in selected folder option from the previously mentioned combo-box, BatchPhoto will find the common lowest-level folder for all the paths of the currently added photos and reproduce the folder structure from within that folder in the output folder
•If you select the Create a subfolder in the original photos' folder option, BatchPhoto will create a subfolder for the processed photos in each folder where the original images reside. So if you add photos from /Summer and /Winter, BatchPhoto will write the processed images in /Summer/Processed respectively /Winter/Processed. Please note that BatchPhoto Monitor will ignore this option and save your photos by default in the output folder which can be selected by choosing the Use selected folder as output destination option from the same combo-box
1.2 Send via E-mail
•To directly attach the processed photos to an e-mail select the Send via E-mail option from the Destination combo-box. Your default e-mail client application will launch automatically and create a new blank e-mail message with all your processed pictures attached to it.
1.3 Upload to (S)FTP
•To upload the processed pictures to a (S)FTP server select the Upload to FTP option from the Destination combo-box. Information like Username, Password and Host will be required in order for the upload to be successful. You can also select the remote Folder on the FTP server to which you want your photos to be uploaded or even the Port through which the connection to the FTP server is established.

2. Format
•If you choose to save your processed pictures on your computer, BatchPhoto will keep the original format of the photos by default. If you choose another destination then JPEG will be the default format. JPEG or JPG is the most widely used image format for digital photos. You can select any other image format from the combo-box
•You can adjust the output format settings by pressing Settings button (not all formats have settings)
3. Settings
•After the processing operation is finished BatchPhoto can open the output folder where the processed photos reside. For that check the Open output folder after processing check-box.
•By default, all processed photos will have the date and attributes of the original ones. If you would like the processed photos to have the current date and the default attributes un-check the Set output photo date and attributes as original check-box
•You can delete the original photos and only keep the processed ones. For that check the Delete source photo after processing check-box.
Any change made in this panel can be undone by selecting Edit → Undo from the main menu bar or using the Ctrl + Z combination. If, by mistake, you undo a change that was valid, that change can be redone by selecting Edit → Redo from the main menu bar or using the Ctrl + Y combination.
See also: