 Many times we are put in the position of having to optimize our photos for print or online use. This optimization process can involve many aspects, among which reducing the size of the files and cropping out anything that might have a negative impact on the image. There are several tools that allow us to properly prepare our pictures, each with its own particularities. In this tutorial we’re going to take a look at how to resize and crop an image in Photoshop.
Easily reduce image size in Photoshop
With the aid of Adobe’s software you can easily change the size of a picture to suit your compression needs. Just make sure to follow these next steps and you’ll be done with your image optimization process in no time:
Step 1
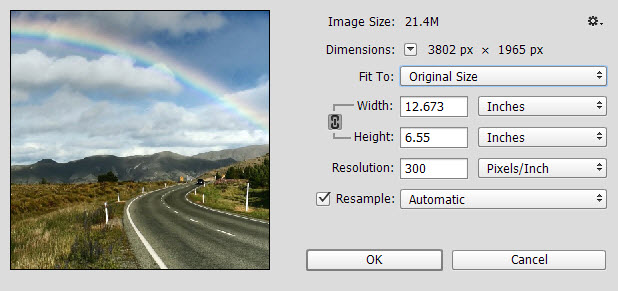
Open the photo you aim to resize in Photoshop. Then go to Image > Image Size.
Step 2
In the new dialog box begin entering the new values for Width and Height, which can be expressed in pixels, percent, inches, centimeters, points, picas or columns. If you want to preserve the original aspect ratio, make sure to select Constrain Proportions (it’s set by default). Change the Resolution by entering a new value expressed in either pixels/inch or pixels/centimeter. Now if you want to change the size of your file or the resolution without altering the pixel count, you should uncheck Resample. Otherwise, if you want your pixels to suitably adjust to the new size or resolution of the image, leave this option checked. Now all you have to do is hit the OK button and you’re done.
Crop using the Crop tool
Step 1
Open a picture in Photoshop and select the Crop tool from the left toolbar.
Step 2
Select the area you want to crop by dragging the corner and edge handles in the direction you want.
Step 3
Go to the Control bar and choose the way you want to crop your image: by ratio or size. If you opt for Ratio, you can either select from the existing presets or enter your own values in the two boxes. If you opt for Size, you’ll need to enter your dimensions for Width and Height (in the first two boxes) and for Resolution (in the third box). If you wish to express your new values in pixels, make sure to type px after the number. 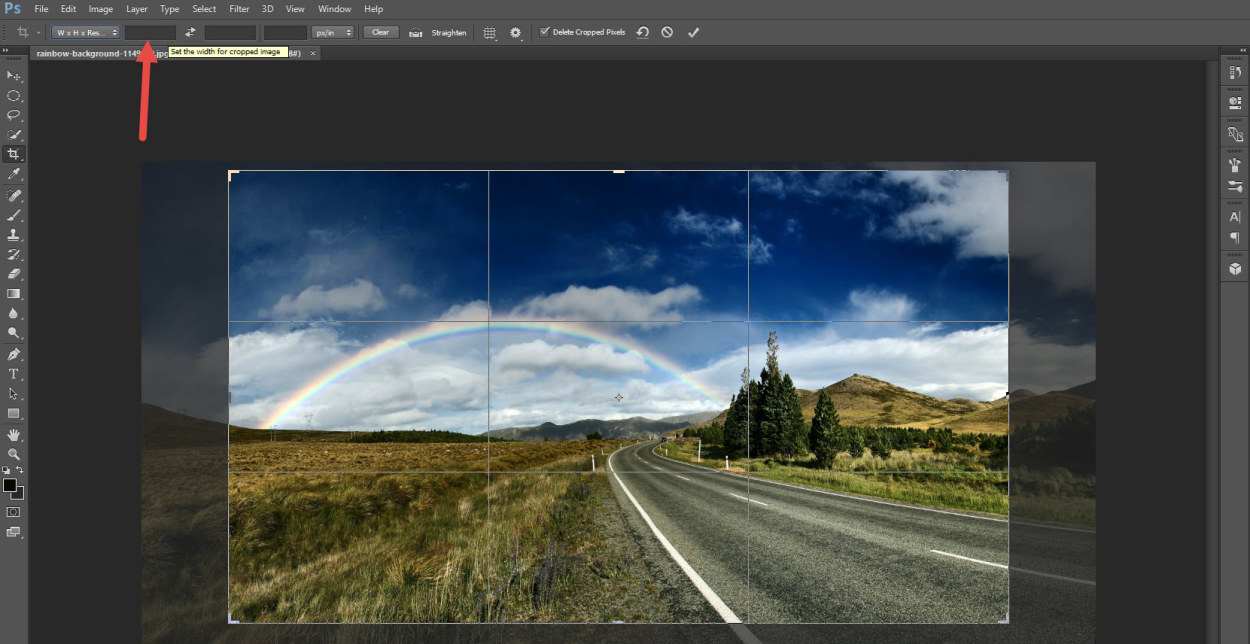
Step 4
Choose a grid overlay that can aid your cropping process between Rule of Thirds, Grid, Diagonal, Triangle, Golden Ratio and Golden Spiral. You can use the Straighten button to straighten crooked or tilted images if it’s the case. Just click the button and draw a line on your image. Drag it to follow the line of your tilted object and just let the software create a nice-looking horizontal line. If everything is according to your needs, then simply click the tick button.
Crop using the Trim tool
One of the benefits of learning how to crop using Photoshop is the fact that you can leverage the software’s numerous features. Thereby in our particular case, if you want to try a different approach, you can crop a photo by resorting to the Trim tool. This tool will trim away any transparent pixels or specific colored areas from your picture. Here’s how:
Step 1
Open your picture in Photoshop and go to Image > Trim.
Step 2
In the new dialog box choose which pixels you want to remove: Transparent pixels (particularly for layered photos), Top Left Pixel Color or Bottom Right Pixel Color. Then select the sides of the image you wish to trim away: Top, Bottom, Left or Right and just hit the OK button.

Learning how to resize a picture and crop out unwanted parts can be beneficial no matter if you have to upload images to a website, post them on social networks or attach them to a business email. With the right tools you can perform these operations easily, efficiently and without losing quality.